Installing Security Onion IDS/NSM on vSphere 5 with SPAN traffic from a Cisco switch
I’ve been using Security Onion (SO) a lot lately, exploring the many great features of this awesome distro. Security Onion provides IDS either through Snort or Suricata as well as many other excellent network security monitoring tools such as Squert, Bro, NetworkMiner, Xplico, and many others. SO also has great open source IDS front end monitoring tools, Sguil and Snorby built in. I like using a VM on my desktop machine running Security Onion as my monitoring station, whilst deploying the Security Onion on my VMware ESXi lab server. I’m going to cover my test lab set up a little in this article for anyone interested in setting up their own.
One of things I love about using VMWare in the test lab is that gives you the ability to build a complete virtual network with different security zones, firewalls and IDS/IPS systems. Not to mention the fact that I couldn’t possibly have ten’s of servers deployed in my home office space, something I can easily do with just a couple of machines and vSphere 5 Business Essentials. You can also get a free copy of ESXi 5 to use in the test lab from VMware although this is limited to a single physical CPU.
You will need a spare NIC installed in the ESXi host to connect to the switch SPAN/Mirror port. Install this in the ESXi host and for the moment leave it unconfigured.
 Configure a new virtual machine. Choose typical from the Create New Virtual Machine dialogue box. Give it a name and select the ESXi datastore to store the virtual machine files. Select the Guest operating system type as Linux and choose Ubuntu Linux 32bit.
Next select the number of NICs you want and which VM Network each is connected to. For now, you can just select 2 NICs and leave them both on the default VM Network. We will look at the switch configuration in due course.
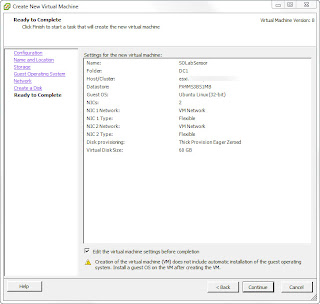
Select the amount of disk space to allocate to the virtual machine and select the type of Thick or Thin provisioned disk, I chose 'Thick Eager Zeroed' for Security Onion as it writes a lot of data to disk and this is supposed give better performance on first block writes.
Once you get that far the Summary screen is displayed and you can click Continue to Create the virtual machine, but it’s best to click the check box - Edit the virtual machine settings before completion then we can set the properties instead of leaving them at default.
 Set the required properties. I’m going to give mine 2 vCPUs, and 4GB Ram. You can vary this according to your needs. How much processing power and RAM will depend on how much traffic you expect SO to analyse.
Remove the floppy drive then click on the New CD/DVD option and select the datastore ISO File for SO that you copied onto the datastore earlier. Make sure you click the ‘Connect at power on’ option.
 Before starting the SO virtual machine, configure the VM Network for the SO sniffing interface.
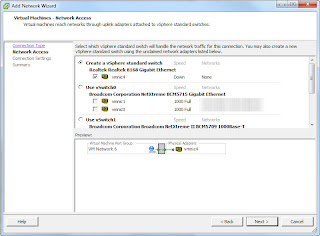
You will create a vSphere standard switch with the spare NIC you installed earlier.
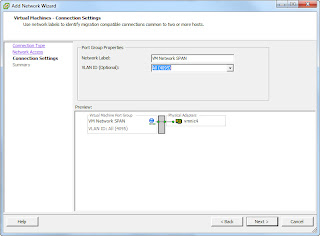
Configure the switch as shown.
After you have created the new vSwitch click properties and select the vSwitch and click the Security tab select Accept for all the options shown.


 Connect the interface configured on your new vSwitch to the Mirror destination. When you start SO we can check to see if we see all the traffic sent to the mirror port using tcpdump.
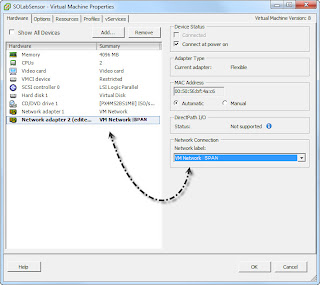
Before you start the SO VM we need to add the sniffing interface to the new vSwitch. Edit the SO configuration in the vSphere client and change the second NIC to the new VM Network SPAN created earlier.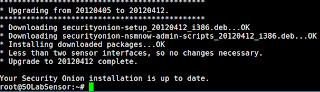 Once SO has restarted it’s a good idea to install the VMWare tools at this point.
Before configuring SO, you can install the updates from Security Onion. This is not strictly speaking required but Doug Burks and the team at SO have been making some great additions and improvements so it's worth doing if you want to keep up with the latest changes. Open the Firefox browser and click the link to the SO site. Find the most recent update in and copy and paste the in-place upgrade command into a terminal window. It’s best to close your bowser before continuing. When you press on the command in the terminal window you need to authenticate to sudo then the updates will be downloaded and installed.
You should be able to see some packets flying past that indicate the sensor can indeed see the traffic on your network. It’s worth noting at this point that you will not see VM to VM traffic on the physical switch because it never leaves the vSwitch that your VMs are on. We can add that as well but we’ll need to do a bit of work back in vSphere, which I will get to shortly.
Once the updates are downloaded and installed we can configure SO to be a sensor and a server and start using it.
Run the Setup program found on the SO desktop . The Setup program asks a few quick questions and configures a sensor and or server. For this SO lab VM I’m going to be setting it up to be both sensor and server.
It’s time to run setup and configure the sniffing interfaces, double-click the setup icon on the desktop, you’ll need to authenticate again to exercise your privileges. After that confirm you want to continue by clicking Yes, Continue. Click No, use Advanced Setup, then select Both so that this VM will be sensor and server in one then click OK. You can then choose to use Suricata or Snort as the default IDS engine. I’m going to stick with Snort because that’s the one I know. Next select eth1 as the sniffing interface. Then pick which IDS rules you want to use.
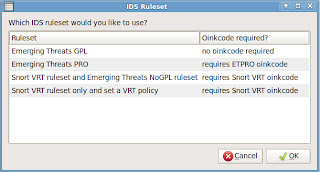
The Snort VRT rules require an oinkcode to download, you can get this free of charge by visiting http://www.snort.org/snort-rules/ and signing-up for the free non-commercial use rules. However, for now I’m going to go with the Emerging Threats GPL rules. I’ll probably change this later by re-running setup. Next you need to enter a username to use with Sguil. Click OK, then enter the email address to use with Snorby. After you click OK you can then enter a password which will be used to authenticate with both Sguil and Snorby, enter a password and then confirm it and click OK. And that’s it! Simply click ‘Yes, proceed with changes!’ and the system is configured and ready to go.

 By the time you have launched Sguil from the icon on the desktop you should find that you already have some events.
Next lets take a look at adding a sensing interface to allow the sensor, to sniff traffic between VM’s on the VM Network vSwitch.
Select the ESXi server in the vSphere client, then select the Configuration tab. From the hardware panel on the left, select Networking. Choose whichever network that you want add a virtual SPAN port to (the one which most of your VMs have an interface in.
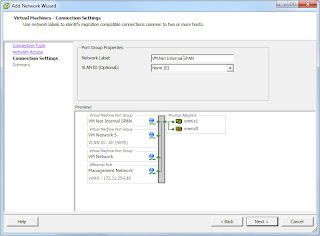
Assuming your main network is called ‘ VM Network’ and it’s in vSwitch0 as mine is, click Add Networking and add a new Virtual Machine labelled network, called VM Net Internal SPAN (or whatever you like), ensure that you select the VLAN ID drop down box and select ALL (4095) to be able to see traffic from all Virtual Machine Labelled networks on that vSwitch.
Once created open the properties for the vSwitch, and select the VM Net Internal SPAN from the list and click edit. On the Security tab change the Promiscuous Mode to Accept.
Next add a new interface to the SO VM. Place the interface into the labelled network you just created, ‘VM Net Internal SPAN’ in my case.
You will need to configure the new interface inside SO as before (link only). You must also re-run setup and this time selecting both sniffing interfaces eth1 and eth2. You should note that re-running setup in SO will clear the events database and any configuration changes (although these are backed up). Essentially running setup recreates your server and sensor anew.
Security Onion gives you a fully fledged IDS and network security monitoring solution in a genuinely easy to install package. In upcoming blog entries I intend to explore more of what SO is capable of.
One of things I love about using VMWare in the test lab is that gives you the ability to build a complete virtual network with different security zones, firewalls and IDS/IPS systems. Not to mention the fact that I couldn’t possibly have ten’s of servers deployed in my home office space, something I can easily do with just a couple of machines and vSphere 5 Business Essentials. You can also get a free copy of ESXi 5 to use in the test lab from VMware although this is limited to a single physical CPU.
Preparation
Once you have download the ISO from http://sourceforge.net/projects/security-onion/files/ upload it to a directory on your datastore on the ESXi server. Mine directory is called ISO but you can call it whatever you like. You could omit this step and access either a local CD drive in the ESXi server or a remote client based drive (or ISO). I like to do it this way so that I can reuse it easily.You will need a spare NIC installed in the ESXi host to connect to the switch SPAN/Mirror port. Install this in the ESXi host and for the moment leave it unconfigured.
Installation
 Configure a new virtual machine. Choose typical from the Create New Virtual Machine dialogue box. Give it a name and select the ESXi datastore to store the virtual machine files. Select the Guest operating system type as Linux and choose Ubuntu Linux 32bit.
 Next select the number of NICs you want and which VM Network each is connected to. For now, you can just select 2 NICs and leave them both on the default VM Network. We will look at the switch configuration in due course.
Select the amount of disk space to allocate to the virtual machine and select the type of Thick or Thin provisioned disk, I chose 'Thick Eager Zeroed' for Security Onion as it writes a lot of data to disk and this is supposed give better performance on first block writes.
Once you get that far the Summary screen is displayed and you can click Continue to Create the virtual machine, but it’s best to click the check box - Edit the virtual machine settings before completion then we can set the properties instead of leaving them at default.

Remove the floppy drive then click on the New CD/DVD option and select the datastore ISO File for SO that you copied onto the datastore earlier. Make sure you click the ‘Connect at power on’ option.
 Before starting the SO virtual machine, configure the VM Network for the SO sniffing interface.
You will create a vSphere standard switch with the spare NIC you installed earlier.
Configure the switch as shown.

After you have created the new vSwitch click properties and select the vSwitch and click the Security tab select Accept for all the options shown.

The Cisco SG 300-28 I use supports Port and VLAN mirroring.

 Connect the interface configured on your new vSwitch to the Mirror destination. When you start SO we can check to see if we see all the traffic sent to the mirror port using tcpdump.
Before you start the SO VM we need to add the sniffing interface to the new vSwitch. Edit the SO configuration in the vSphere client and change the second NIC to the new VM Network SPAN created earlier.
Start the new virtual machine from the ISO. Open a console window for the new SO installation.
Press Return at the boot prompt, choose Install from the menu and press return.
Select Language, click forward
Select Timezone, click forward (This will be changed to UTC during SO Setup)
Keyboard layout, click forward
Prepare disk space
Who are you? name, username, password etc
Click Install from the summary screen
Click Restart Now when it's complete
Press Enter to confirm the disk is removed
Once Security Onion has restarted login with the username and password set during install
Initially both network interfaces will be set to DHCP, this is OK but it’s a good idea to set the management interface to a static address so that it’s consistent, click here for instructions. The sniffing interface doesn’t need an address you can either set this to link only or manually configure it to be up without any address assigned. You can configure the network interfaces by right-clicking the network icon in top right and choosing ‘Edit Connections as shown. You might need to disable then re-enble networking by right-clicking the network icon.
Test that you have network connectivity by launching the firefox browser and clicking the link to the Security Onion web site (link http://securityonion.blogspot.com). If you have then now is a good time to install OS updates. Click the Application menu go down to System then select update manager. Click Check and enter your password. Click Install Updates. If you are prompted to install Grub, it is safe to continue without installing the boot loader. Click Restart Now, then close the updates dialogue box. A restart icon will have appeared to the left of the network icon click there to initiate the restart. Now choose Application, Settings, Screen Saver and change the default screen saver to blank screen.
 Once SO has restarted it’s a good idea to install the VMWare tools at this point.
 Before configuring SO, you can install the updates from Security Onion. This is not strictly speaking required but Doug Burks and the team at SO have been making some great additions and improvements so it's worth doing if you want to keep up with the latest changes. Open the Firefox browser and click the link to the SO site. Find the most recent update in and copy and paste the in-place upgrade command into a terminal window. It’s best to close your bowser before continuing. When you press on the command in the terminal window you need to authenticate to sudo then the updates will be downloaded and installed.
The services are automatically restarted once updates have completed.
Before setting up the Sensor and Server it’s worth checking to see if your sniffing interface can see traffic from the SPAN/Port Mirror on the switch.
Before setting up the Sensor and Server it’s worth checking to see if your sniffing interface can see traffic from the SPAN/Port Mirror on the switch.
$ sudo tcpdump -nni eth1You should be able to see some packets flying past that indicate the sensor can indeed see the traffic on your network. It’s worth noting at this point that you will not see VM to VM traffic on the physical switch because it never leaves the vSwitch that your VMs are on. We can add that as well but we’ll need to do a bit of work back in vSphere, which I will get to shortly.
Once the updates are downloaded and installed we can configure SO to be a sensor and a server and start using it.
Run the Setup program found on the SO desktop . The Setup program asks a few quick questions and configures a sensor and or server. For this SO lab VM I’m going to be setting it up to be both sensor and server.
It’s time to run setup and configure the sniffing interfaces, double-click the setup icon on the desktop, you’ll need to authenticate again to exercise your privileges. After that confirm you want to continue by clicking Yes, Continue. Click No, use Advanced Setup, then select Both so that this VM will be sensor and server in one then click OK. You can then choose to use Suricata or Snort as the default IDS engine. I’m going to stick with Snort because that’s the one I know. Next select eth1 as the sniffing interface. Then pick which IDS rules you want to use.

The Snort VRT rules require an oinkcode to download, you can get this free of charge by visiting http://www.snort.org/snort-rules/ and signing-up for the free non-commercial use rules. However, for now I’m going to go with the Emerging Threats GPL rules. I’ll probably change this later by re-running setup. Next you need to enter a username to use with Sguil. Click OK, then enter the email address to use with Snorby. After you click OK you can then enter a password which will be used to authenticate with both Sguil and Snorby, enter a password and then confirm it and click OK. And that’s it! Simply click ‘Yes, proceed with changes!’ and the system is configured and ready to go.

 By the time you have launched Sguil from the icon on the desktop you should find that you already have some events.
Next lets take a look at adding a sensing interface to allow the sensor, to sniff traffic between VM’s on the VM Network vSwitch.
Select the ESXi server in the vSphere client, then select the Configuration tab. From the hardware panel on the left, select Networking. Choose whichever network that you want add a virtual SPAN port to (the one which most of your VMs have an interface in.
Assuming your main network is called ‘ VM Network’ and it’s in vSwitch0 as mine is, click Add Networking and add a new Virtual Machine labelled network, called VM Net Internal SPAN (or whatever you like), ensure that you select the VLAN ID drop down box and select ALL (4095) to be able to see traffic from all Virtual Machine Labelled networks on that vSwitch.
Once created open the properties for the vSwitch, and select the VM Net Internal SPAN from the list and click edit. On the Security tab change the Promiscuous Mode to Accept.
Next add a new interface to the SO VM. Place the interface into the labelled network you just created, ‘VM Net Internal SPAN’ in my case.
You will need to configure the new interface inside SO as before (link only). You must also re-run setup and this time selecting both sniffing interfaces eth1 and eth2. You should note that re-running setup in SO will clear the events database and any configuration changes (although these are backed up). Essentially running setup recreates your server and sensor anew.
Security Onion gives you a fully fledged IDS and network security monitoring solution in a genuinely easy to install package. In upcoming blog entries I intend to explore more of what SO is capable of.


Good article, thanks.
ReplyDelete